
루아 스크립트를 이용한 폰트 및 이미지 찾기
개요
PS1 게임의 폰트나 텍스처를 수정하려면 해당 텍스처 데이터가 RAM 어디에 있는지 알아야 한다. 하지만 PS1의 GPU는 CPU 버스에 VRAM이 매핑되어 있지 않기 때문에 CPU가 VRAM에 직접 접근할 수 없다. 반드시 GPU 커맨드(GP0)나 DMA를 통해서만 VRAM에 데이터를 올릴 수 있다. 이번 글에서는 GPU Logger에서 확인한 텍스처 정보를 바탕으로 VRAM에 업로드되는 텍스처의 RAM 원본 주소를 PCSX-Redux의 Lua 스크립트로 추적하는 방법을 설명한다.
사전 지식
- 관련 하드웨어 레지스터: DMA2는 GPU 전용 채널로, 0x1F801810(GP0/GPUREAD)에 소프트웨어로 접근하는 것과 동등하다.
0x1F801810 (Write) - GP0: GPU 커맨드/패킷 전송 (렌더링 및 VRAM 접근) 0x1F8010A0 - DMA2 MADR: DMA 메모리 주소 레지스터 (소스/목적지 RAM 주소) 0x1F8010A8 - DMA2 CHCR: DMA 채널 제어 레지스터 (전송 시작 트리거) - GP0(A0h) - Copy Rectangle (CPU to VRAM): RAM에서 VRAM으로 텍스처 데이터를 업로드하는 명령이다.
GP0(A0h) - Copy Rectangle (CPU to VRAM) 1st Command (Cc000000h) 2nd Destination Coord (YyyyXxxxh) ;Xpos counted in halfwords 3rd Width+Height (YsizXsizh) ;Xsiz counted in halfwords ... Data (...) <--- usually transferred via DMA - GP0(64h~7Fh) - Textured Rectangle: VRAM에 이미 올라간 텍스처를 화면에 그리는 명령이다. 다양한 변형이 존재한다.
GP0(64h) - Textured Rectangle, variable size, opaque, texture-blending
GP0(65h) - Textured Rectangle, variable size, opaque, raw-texture
GP0(66h) - Textured Rectangle, variable size, semi-transp, texture-blending
GP0(67h) - Textured Rectangle, variable size, semi-transp, raw-texture
GP0(6Ch) - Textured Rectangle, 1x1 (nonsense), opaque, texture-blending
GP0(6Dh) - Textured Rectangle, 1x1 (nonsense), opaque, raw-texture
GP0(6Eh) - Textured Rectangle, 1x1 (nonsense), semi-transp, texture-blending
GP0(6Fh) - Textured Rectangle, 1x1 (nonsense), semi-transp, raw-texture
GP0(74h) - Textured Rectangle, 8x8, opaque, texture-blending
GP0(75h) - Textured Rectangle, 8x8, opaque, raw-texture
GP0(76h) - Textured Rectangle, 8x8, semi-transparent, texture-blending
GP0(77h) - Textured Rectangle, 8x8, semi-transparent, raw-texture
GP0(7Ch) - Textured Rectangle, 16x16, opaque, texture-blending
GP0(7Dh) - Textured Rectangle, 16x16, opaque, raw-texture
GP0(7Eh) - Textured Rectangle, 16x16, semi-transparent, texture-blending
GP0(7Fh) - Textured Rectangle, 16x16, semi-transparent, raw-texture
1st  Color+Command     (CcBbGgRrh) (color is ignored for raw-textures)
2nd  Vertex            (YyyyXxxxh) (upper-left edge of the rectangle)
3rd  Texcoord+Palette  (ClutYyXxh) (for 4bpp Textures Xxh must be even!)
(4th) Width+Height      (YsizXsizh) (variable size only) (max 1023x511)
Unlike for Textured-Polygons, the "Texpage" must be set up separately for Rectangles, via GP0(E1h). Width and Height can be up to 1023x511,
however, the maximum size of the texture window is 256x256 (so the source data will be repeated when trying to use sizes larger than 256x256).
특정하기 어려운 이유
0xA0 (Copy Rectangle CPU->VRAM)
VRAM에 텍스처 데이터를 업로드하는 명령
2nd: Destination Coord (YyyyXxxxh) = VRAM 상의 복사 위치
3rd: Width+Height (YsizXsizh) = Xsiz는 halfword 단위
이후 DMA로 RAM에서 픽셀 데이터를 VRAM에 전송
0x64 (Textured Rectangle)
VRAM에 이미 올라간 텍스처를 화면에 그리는 명령
2nd: 화면에 그릴 XY 좌표
3rd: UV + CLUT = 텍스처 시트 안에서의 위치
4th: 그릴 크기 (WH)
이 두 명령은 순차적으로 실행되는 것이 아니며, A0으로 VRAM에 올린 후 한참 뒤에 0x64로 화면에 그릴 수도 있다. 또한 A0의 복사 크기는 전체일 수도 있고 일부만일 수도 있어서, 0x64의 좌표/크기와 직접 대응시킬 수 없다.
이제 예시로 0x64에서 A0의 좌표를 역추적하는 방법을 알고 루아 스크립트를 작성해보는 것이다. 핵심은 0x64의 텍스처 소스 위치가 TexPage(E1) + UV 오프셋으로 결정된다는 점이고 이 정보가 쉽게 GPU Logger에 노출되어 있다.
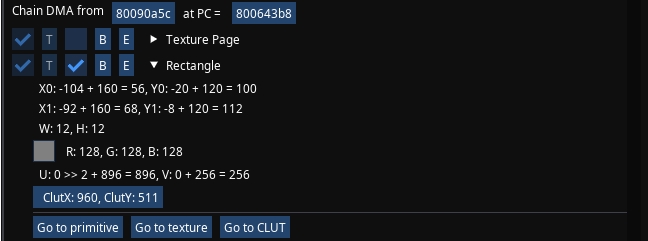
First_rectangle_info
DMA CHAIN
DRAW TEXT
VRAM_COPY(u:896, v:256)
위 이미지들을 정리하면 일단 DMA CHAIN에서 회색 하이라이팅된 리틀엔디언 주요 값들만 해석하면
GP0(64h)
64808080  1st Color+Command
FFECFF98  2nd Vertex (X=0xFF98, Y=0xFFEC)
7FFC0000  3rd Texcoord+Palette (U=0x00, V=0x00, CLUT=0x7FFC)
000C000C  4th Width+Height (W=12, H=12)
화면 좌표 계산
x0: -104(FF98) + 160 = 56
x1: -92 + 160 = 68 == (-104 + 12(W값)) + 160 = 68

y0: -20(FFEC) + 120 = 100
y1: -8 + 120 = 112 == (-20 + 12(H값)) + 120 = 112
u: 0>> 2 + 896 = 896, v: 0 + 256 = 256도 로그에 보이는데 앞서 말했듯이 제일 중요하다. 이것이 바로 VRAM에 복사하는 XY좌표로 보면 된다. 이 값이 A0 명령의 Destination Coord와 일치한다. 따라서 GPU loger에서 0x64의 텍스처들의 “첫 번째 Rectangle”의 UV 계산값을 찾아, 그 값을 A0 검색 조건에 넣으면 된다.
루아 스크립트
PCSX-Redux의 Lua 스크립트 API에 대한 자세한 내용은 공식 문서 의 LUA 항목을 참고해서 코딩하면 된다.
A0 매칭 후 RAM 소스 주소를 잡는 흐름
- CPU가 sw로 GP0(0x1F801810)에 A0 헤더 3워드를 씀
- 1st: 0xA0xxxxxx (커맨드)
- 2nd: VRAM 좌표 (XY) 여기서 입력한 X,Y와 매칭
- 3rd: 크기 (WH)
-
GPU가 픽셀 데이터 수신 대기 상태
- CPU가 DMA2를 설정
- MADR(0x1F8010A0)에 픽셀 데이터의 RAM 소스 주소를 sw로 씀
- BCR 설정
- CHCR(0x1F8010A8)에 sw로 써서 DMA 전송 시작
- DMA가 MADR 주소에서 픽셀 데이터를 읽어 GP0에 전송으로 VRAM에 업로드 완료
루아 스크립트 동작 방식
- GP0(0x1F801810) Write -> A0 헤더 감시, XY 매칭되면 플래그 ON
- MADR(0x1F8010A0) Write -> 플래그 ON일 때 sw 디코딩으로 MADR 값 저장
- CHCR(0x1F8010A8) Write -> 플래그 ON + MADR 저장됨 -> 확정, 에뮬 일시정지
CHCR까지 확인하는 이유: MADR만으로는 이 DMA가 A0 픽셀 전송용인지 확신할 수 없다. CHCR Write가 와야 DMA가 실제로 시작되는 것이므로, A0 매칭 -> MADR 캡처 -> CHCR 트리거 순서가 모두 확인되어야 정확한 소스 주소로 확정할 수 있다.
스크립트 코드
local ffi = require("ffi")
local memPtr = ffi.cast("uint8_t*", PCSX.getMemPtr())

local function readRAM32(addr)
    local phys = bit.band(addr, 0x1FFFFF)
    return ffi.cast("uint32_t*", memPtr + phys)[0]
end

-- HW 레지스터(0x1F801xxx)는 PCSX.getMemPtr()로 읽을 수 없다.
-- 따라서 BP 콜백 시점에서 현재 PC의 sw 명령어를 디코딩하여 CPU가 쓰려는 값(rt 레지스터)을 직접 가져온다.
-- sw rt, offset(base) → opcode 0x2B (43)
local function getWrittenValue()
    local regs = PCSX.getRegisters()
    local inst = readRAM32(regs.pc)
    local op = bit.rshift(inst, 26)
    if op ~= 0x2B then return nil end  -- sw가 아니면 무시
    local rt = bit.band(bit.rshift(inst, 16), 0x1F)
    return regs.GPR.r[rt]
end

local target_x = 896
local target_y = 256

local log_entries = {}
local MAX_LOG = 200
local word_index = 0
local captured_xy = 0
local captured_wh = 0
local running = false
local a0_matched = false
local matched_x = 0
local matched_y = 0
local matched_w = 0
local matched_h = 0
local matched_pc = 0
local pending_madr = 0

bp_gp0 = nil
bp_madr = nil
bp_chcr = nil

local function startFinder()
    log_entries = {}
    word_index = 0
    a0_matched = false
    pending_madr = 0
    running = true
    bp_gp0 = PCSX.addBreakpoint(0x1F801810, "Write", 4, "GP0 A0", function(address, width, cause)
    -- PCSX.addBreakpoint(address, type, width, label, callback)
		-- type: "Exec", "Read", "Write"
    -- width: 1, 2, 4 (바이트 단위)
    -- callback 없으면 그냥 Watch
    -- callback 있으면 함수 실행
        local ok, err = pcall(function()
            local val = getWrittenValue()
            if val == nil then
                word_index = 0
                return
            end

            if word_index == 0 then
                if bit.rshift(val, 24) == 0xA0 then
                    word_index = 1
                end
            elseif word_index == 1 then
                captured_xy = val
                word_index = 2
            elseif word_index == 2 then
                local x = bit.band(captured_xy, 0xFFFF)
                local y = bit.band(bit.rshift(captured_xy, 16), 0xFFFF)
                local w = bit.band(val, 0xFFFF)
                local h = bit.band(bit.rshift(val, 16), 0xFFFF)

                if x == target_x and y == target_y then
                    a0_matched = true
                    matched_x = x
                    matched_y = y
                    matched_w = w
                    matched_h = h
                    matched_pc = PCSX.getRegisters().pc
                    pending_madr = 0
                    print(string.format("A0 MATCHED! X=%d Y=%d W=%d H=%d PC=0x%08X, waiting for CHCR...",
                        x, y, w, h, matched_pc))
                end

                word_index = 0
            end
        end)
        if not ok then print("GP0 ERR: " .. err) end
    end)

    -- A0 매칭 후, CPU가 MADR에 쓰는 값을 sw 디코딩으로 캡처
    bp_madr = PCSX.addBreakpoint(0x1F8010A0, "Write", 4, "DMA2 MADR", function(address, width, cause)
        local ok, err = pcall(function()
            if a0_matched then
                local val = getWrittenValue()
                if val then
                    pending_madr = val
                    print(string.format("MADR captured: 0x%08X", val))
                end
            end
        end)
        if not ok then print("MADR ERR: " .. err) end
    end)

    -- CHCR Write = DMA 전송 시작. 이 시점에서 pending_madr이 확정된 소스 주소
    bp_chcr = PCSX.addBreakpoint(0x1F8010A8, "Write", 4, "DMA2 CHCR", function(address, width, cause)
        local ok, err = pcall(function()
            if a0_matched and pending_madr ~= 0 then
                local pc = PCSX.getRegisters().pc

                print(string.format("PIXEL DATA SOURCE! MADR=0x%08X W=%d H=%d A0_PC=0x%08X CHCR_PC=0x%08X",
                    pending_madr, matched_w, matched_h, matched_pc, pc))

                table.insert(log_entries, {
                    x = matched_x,
                    y = matched_y,
                    w = matched_w,
                    h = matched_h,
                    madr = pending_madr,
                    a0_pc = matched_pc,
                    chcr_pc = pc,
                })
                if #log_entries > MAX_LOG then
                    table.remove(log_entries, 1)
                end

                a0_matched = false
                pending_madr = 0
                PCSX.pauseEmulator()
            end
        end)
        if not ok then print("CHCR ERR: " .. err) end
    end)

    print(string.format("A0 Finder Started: X=%d Y=%d", target_x, target_y))
end

local function stopFinder()
    if bp_gp0 then bp_gp0:remove(); bp_gp0 = nil end
    if bp_madr then bp_madr:remove(); bp_madr = nil end
    if bp_chcr then bp_chcr:remove(); bp_chcr = nil end
    running = false
    a0_matched = false
    pending_madr = 0
    print("A0 Finder Stopped")
end

function DrawImguiFrame()
    local show = imgui.Begin("GP0 A0 Finder", true)
    if show then
        local changed_x, new_x = imgui.InputInt("X", target_x)
        if changed_x then target_x = new_x end

        local changed_y, new_y = imgui.InputInt("Y", target_y)
        if changed_y then target_y = new_y end

        imgui.Separator()

        if not running then
            if imgui.Button("Start") then startFinder() end
        else
            if imgui.Button("Stop") then stopFinder() end
        end
        imgui.SameLine()
        if imgui.Button("Clear") then log_entries = {} end
        imgui.SameLine()
        if imgui.Button("Copy") then
            local text = ""
            for i, e in ipairs(log_entries) do
                text = text .. string.format("#%-4d X=%-5d Y=%-5d W=%-5d H=%-5d MADR=0x%08X A0_PC=0x%08X CHCR_PC=0x%08X\n",
                    i, e.x, e.y, e.w, e.h, e.madr, e.a0_pc, e.chcr_pc)
            end
            imgui.SetClipboardText(text)
        end

        imgui.Separator()
        imgui.TextUnformatted(string.format("Running: %s  Target: X=%d Y=%d  Waiting: %s  Entries: %d",
            running and "YES" or "NO", target_x, target_y,
            a0_matched and "CHCR" or "NO", #log_entries))
        imgui.Separator()

        if imgui.BeginTable("log", 8) then
            imgui.TableSetupColumn("#")
            imgui.TableSetupColumn("X")
            imgui.TableSetupColumn("Y")
            imgui.TableSetupColumn("W")
            imgui.TableSetupColumn("H")
            imgui.TableSetupColumn("MADR")
            imgui.TableSetupColumn("A0 PC")
            imgui.TableSetupColumn("CHCR PC")
            imgui.TableHeadersRow()
            for i, e in ipairs(log_entries) do
                imgui.TableNextRow()
                imgui.TableNextColumn() imgui.TextUnformatted(tostring(i))
                imgui.TableNextColumn() imgui.TextUnformatted(tostring(e.x))
                imgui.TableNextColumn() imgui.TextUnformatted(tostring(e.y))
                imgui.TableNextColumn() imgui.TextUnformatted(tostring(e.w))
                imgui.TableNextColumn() imgui.TextUnformatted(tostring(e.h))
                imgui.TableNextColumn() imgui.TextUnformatted(string.format("0x%08X", e.madr))
                imgui.TableNextColumn() imgui.TextUnformatted(string.format("0x%08X", e.a0_pc))
                imgui.TableNextColumn() imgui.TextUnformatted(string.format("0x%08X", e.chcr_pc))
            end
            imgui.EndTable()
        end
    end
    imgui.End()
end
사용 방법
- 루아 코드 삽입하기: dofile(“경로\gpu_a0_source_finder.lua”)
- GPU Logger에서 확인한 X, Y 값을 입력하고, 찾을 이미지가 VRAM에 올라오는 시점 이전에 Start 버튼을 누른다.
- 값이 일치하면 자동으로 일시 정지됨.
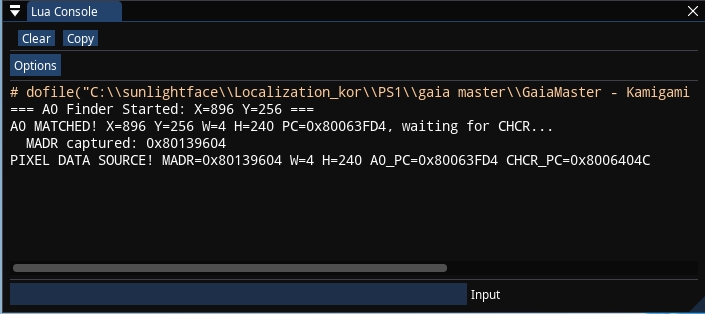
lua console
GP0 A0 Finder
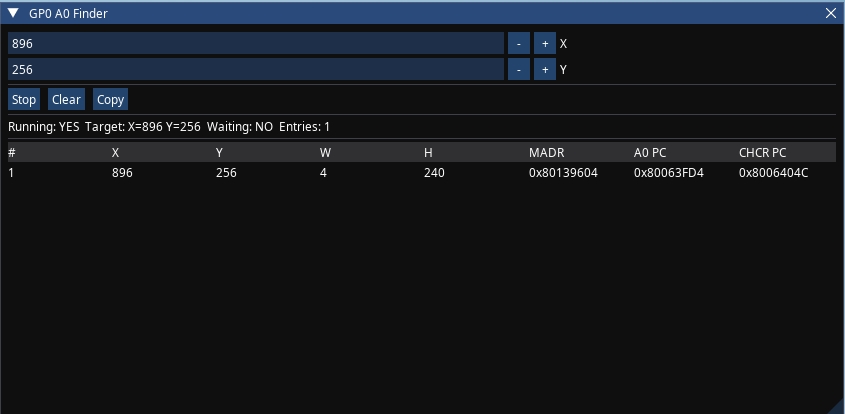
컬럼 해석
- x: VRAM 목적지 X 좌표 (= GPU Logger의 u 값)
- y: VRAM 목적지 Y 좌표 (= GPU Logger의 v 값)
- w: 폭 (halfword 단위). 4bpp -> ×4, 8bpp -> ×2, 16bpp -> ×1 로 실제 픽셀 폭 계산
- h: 높이 (픽셀 단위, 그대로 사용)
- MADR: 텍스처 픽셀 데이터의 RAM 소스 주소
- A0 PC: CPU가 A0 커맨드를 GP0에 Write한 코드 주소
- CHCR PC: CPU가 DMA2 CHCR에 Write하여 전송을 시작한 코드 주소
실행 결과 예시
A0 Finder Started: X=896 Y=256
A0 MATCHED! X=896 Y=256 W=4 H=240 PC=0x80063FD4, waiting for CHCR...
MADR captured: 0x80139604
PIXEL DATA SOURCE! MADR=0x80139604 W=4 H=240 A0_PC=0x80063FD4 CHCR_PC=0x8006404C
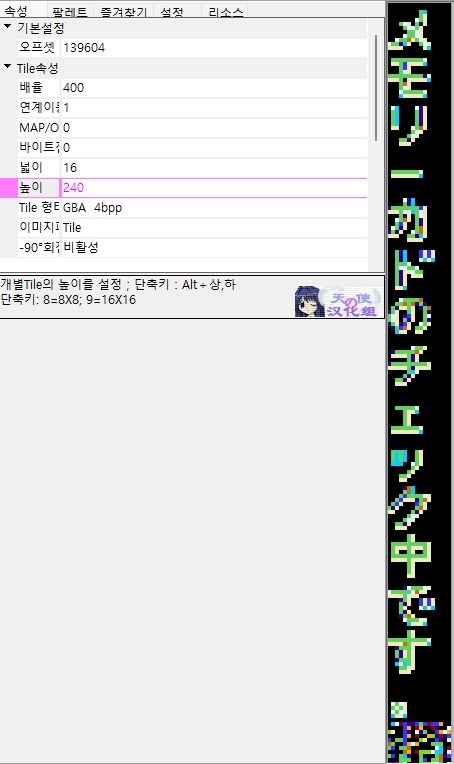
W=4는 halfword 단위이므로, 4bpp 기준 실제 픽셀 폭은 4 × 4 = 16px, 높이는 240px이다. 메인 메모리 덤프를 떠서 해당 주소를 크리스탈 타일 등의 도구로 확인하면 텍스처를 볼 수 있다.
찾은 MADR 주소의 원본 추적
MADR로 찾은 RAM 주소가 반드시 최종 원본은 아닐 수 있다. 상황에 따라 추가 추적이 필요하다
- 모든 텍스처를 한꺼번에 VRAM에 올리는 경우: MADR 자체가 원본 주소이다. 추가 추적이 필요 없다.
- 원하는 텍스처만 조립하여 올리는 경우: MADR은 가공을 거친 주소이다. 해당 주소에 Write Breakpoint를 걸어 조립하는 함수를 찾고, 거기서 원본 주소를 역추적할 수 있다.
- 압축되어 있는 경우: 2번에서 찾은 해제된 데이터의 주소에 Breakpoint를 걸어, 압축 해제 루틴과 압축된 원본 파일의 위치를 확인할 수 있다.
이 부분은 디버깅 기초 지식이 있으면 어렵지 않으므로 해당 글에서는 자세히 다루지 않았다.
결론
PS1 역공학에서 텍스처의 RAM 원본 주소를 찾는 작업은, TTY 디버그 메시지의 CPU 로그를 하나하나 추적하거나 무수한 Breakpoint를 반복적으로 설정하는 노가다로도 가능하다. 다만 이 방식은 비효율적이며 대상이 바뀔 때마다 같은 수고를 반복해야 한다.
반면에 하드웨어의 동작 원리를 이해하고 있다면 이야기가 달라진다. GPU 커맨드의 구조, DMA 전송의 순서, VRAM과 RAM의 관계 등 플랫폼의 스펙과 문서를 먼저 학습하면 그 지식을 바탕으로 정확한 지점에 최소한의 조건만 거는 스크립트를 작성할 수 있다.
A0 명령어의 Destination Coord 매칭 -> MADR 캡처 -> CHCR 트리거 확인은 하드웨어 동작 순서를 유사하게 코드로 옮긴 것에 불과하다. 특별한 기술이 아니라 문서를 읽고 이해한 내용을 스크립트로 자동화한 것이므로 대단한 것도 아니다.
무작정 동적 디버깅에만 의존하여 씨름하기 전에, 해당 플랫폼의 하드웨어 문서와 스펙을 충분히 학습하면 처음에 늦고 어려울지 몰라도 그것이 결국 가장 빠르고 정확한 길이 될 수 있지 않을까 생각된다..